Headless Servers, Dancing KVM-Bewitched Screens…

When using a headless server, certain operating systems’ window managers don’t handle a lack of attached display properly, often ending up with issues when attempting to remotely mirror/access session 0. Some workarounds exist, including “faking a display“, but that has serious side-effects when actually hooking up a real display or when working with some software that could add virtual displays (making that “fake display” suddenly part of a multi-monitor setup which you can’t see).

Similarly, most window managers flail (not fail) spectacularly when one or more displays is/are switched away from it (when using a KVM that does not have EDID emulation), resulting in screen resizing, application window movements et. al., and switching it back fails to relocate certain windows and UI elements back to the previous location/size/state. Whereas this point may be more an issue with combination of OS and application, it is still an irritating issue for KVM users.

The simple solution I have found is to always use a HDMI EDID emulator with pass-through at the output display port/s, meaning that:

  1. for the former use case (of headless servers), the machine always thinks a display is attached and session 0 will be on that/those “display/s”, with the ability to just plug my 13.3″ portable monitor* via HDMI (and still stay sane)
  2. and for the latter use case, I can switch away one or more displays and the machine still thinks the display/s are working – ergo no “dancing” windows

This has certain limitations though:

  • unless the pass-through copies the EDID of the sink (i.e. display), the output (i.e. resolution, refresh rate, audio capabilities) will be limited to the EDID “mode”/capabilities of the HDMI emulator
    • some emulators fail to copy the sink’s EDID after starting/initializing (instead using some preset), so for those oddballs, you will need to ensure you start up the system (i.e. start providing power to the pass-through emulator) with the display “attached” (e.g. KVM switched to machine being started)
  • “unusual” modes (like wide and ultra-wide screens like the my 5120×1440@120/144Hz Prism X490 Pro* and Asus XG49WCR* with high refresh rates) or attempting to use HDR and/or VRR features would fail, with HDMI sync limited (usually to UWQHD i.e. 3440x1440p @ 30Hz with no audio)

This site DOES say the stuff we USE, not the stuff we wanna sell. :)

    • I am guessing here, but
      • maybe the HDMI pass-through emulators just cannot handle bandwidth required and therefore will have to sync at lower rates/modes
      • maybe the HDMI emulator’s EDID table does not have the modes in question – not sure if reprogramming the EDID one would work

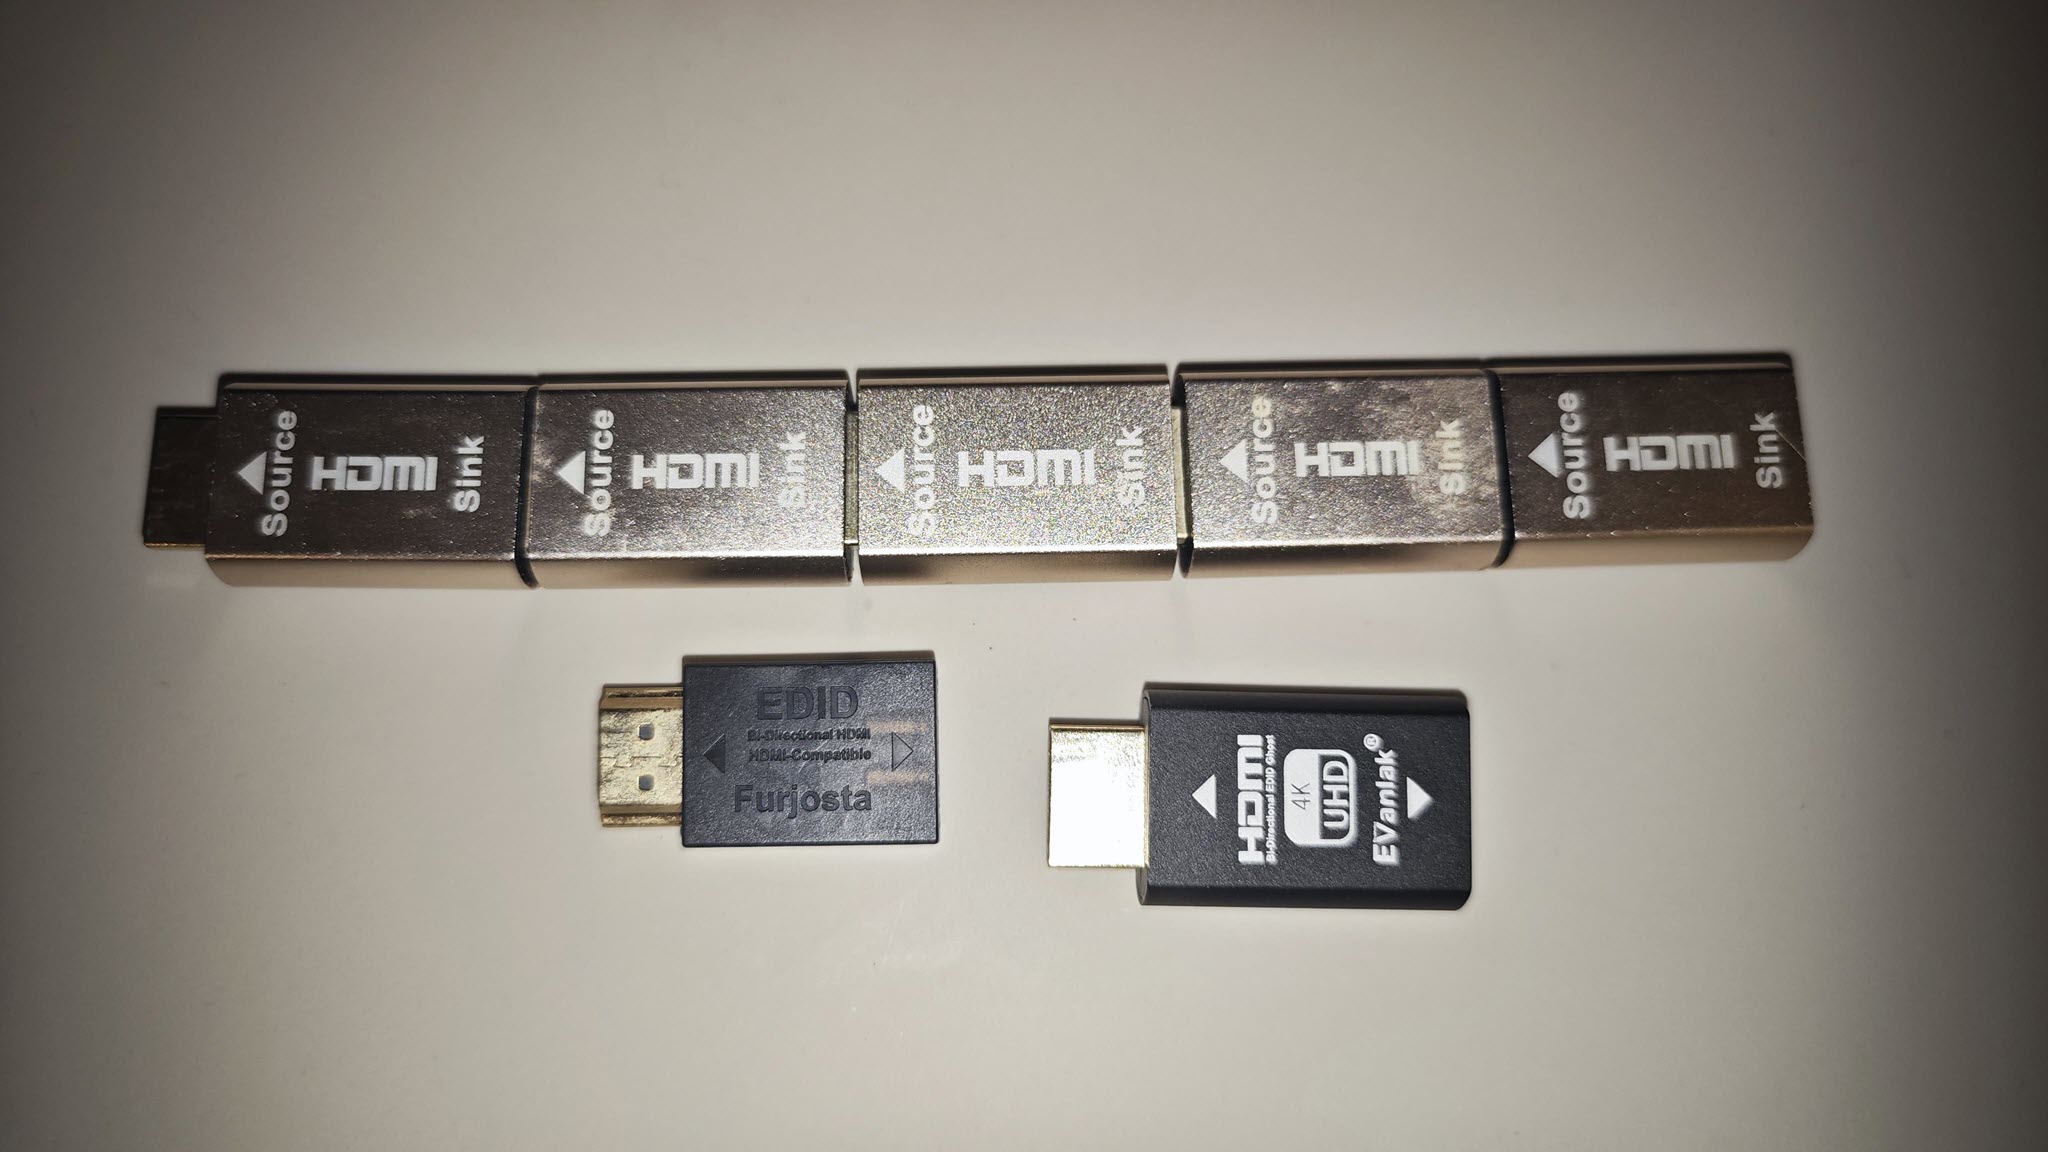
For easy reference (and purchase, if you will), I use several of these:


*NOTE: This is an affiliate link, so I may get some commission, but at no additional cost to purchasers purchasing through this link. For Amazon Affiliate links, as an Amazon Associate, I earn from qualifying purchases.

pfSense and Empty Packages…

I ran across this issue of having the pfSense’s “Available Packages” under “System” > “Package Manager” show up empty.

I “stupidly” followed the troubleshooting steps, and discovered that everything was back at base release (i.e. version x.y.0), and had to (fortunately, successfully) update both pfSense and packages back to latest.

Several different Netgate forums pointed to DNS issues, but I confirmed that I could resolve locally (i.e. my DNS resolver was “listening” correctly on localhost/127.0.0.1 and pkg-static info -x pfSense, pfSense-repoc and host pkg01-atx.netgate.com all worked without issue).

So, it appeared that two fixes were offered:

  1. just hit “Save” on the “System” > “Update” > “Updates Settings” page (without changing anything), or
  2. if you don’t use IPv6, ensure to set your WAN interface “IPv6 Configuration Type” to “DHCP6” instead of “None” (under “Interfaces” > “WAN”)

I tried #2 and have pulled the repository but reverted the change (I hate setting something I know I’m not going to use), so will update later on if the issue reoccurs and I can test #1.

Secure Boot Shim-anigans Ahoy!

So, I had to purchase a new laptop for someone, and as per usual, it came with the entire SSD capacity allocated, which I still feel is bad practice – specifically ensuring there is unallocated space that the drive firmware knows about, assuming TRIM is supported by both OS, controller and drive, (which, AFAIK, all “modern” OS and hardware do) to improve the drive’s wear-leveling ability and thereby extending the SSD’s lifespan.

To do so, I use a “rule of thumb” to leave ~20% of unpartitioned space – at the “end” of the disk (from a “logical” view of the partition table, regardless MBR or GPT). Usually, I simply use a “multi-boot” USB stick created using YUMI or Ventoy (the former now looking like a “wrapping” of the latter in its latest “exFAT” variant).

Aware of the shenanigans/rain dance required to make UEFI secure boot work from such bootloaders, like hundreds of other times (but never done for awhile), I simply (1) disabled CSM in BIOS, (2) enabled secure boot (and rebooted), (3) manually loaded the ENROLL_THIS_KEY_IN_MOKMANAGER.cer into the key store via BIOS from the prepared Ventoy USB disk…

I then confidently rebooted the laptop, pointing to the USB UEFI as the boot device, then ran headlong into the wall with a sickening SMACK. The wall was black, with only the words “Verifying shim SBAT data failed: Security Policy Violation” emblazoned across the top…

Attempting to fix this on this “new” laptop took me off on tangent, wasting nearly a half day trying to research and resolve… Hopefully this helps someone else with the “summary” below, assuming you have a working Linux system that can mount the USB device’s bootloader (i.e. EFI partition), since Windows cannot (without jumping through hoops)…

Continue reading

Adventures with a Qotom C3758R Unit

I purchased a Qotom Intel Atom (“Denverton”) C3758R* w/4x SFP+ port “mini server”, with the intention to utilise the SFP+ ports and upgrade my home Internet connection to 10Gbps…

Here are some of the main (pain?) points:

  • I had to obtain the manual from the seller/supplier; I’m plugging it here for convenience…
  • WARNING: VGA-only!
    • I bought the device, more worried about the number of ETH and SFP+ ports than “trivialities” like the display output (expecting anything post-2020 to have HDMI or DP output), so was totally caught off guard when it arrived with only VGA output, with nary a VGA-capable display in sight…
    • I dragged the device to an older Dell 2719H display that was nearby, and “borrowed” a VGA cable from my cousin, then proceeded to start testing…
    • thankfully, a “rushed order” Vention VGA-to-HDMI* adapter came to the rescue soon after – beware that although it supported the BIOS mode, certain other low-resolution text modes are not (looking nastily at gparted‘s keyboard mapping/initialisation screen); I cannot say if the installation of the Ubuntu 24.04 LTS image from my Ventoy multiboot USB stick would work through the VGA adapter, as I did the installation using the Dell 2719H display
    • as a back up, you could attempt to configure and install everything through the console…
  • AMI BIOS with Test MOKs (Machine Owner Key)!
  • Slow start-up w/A-Tech 2x 32GB DDR4 3200MHz ECC Unbuffered SODIMMs* (yes, I may confirm they work, but as of writing this, there is a cheaper NEMIX alternative* – from Amazon Singapore anyway)
    • due to RAM tests, you get a blank screen all the way till after BIOS and VGA output is initiated (and not because of the aforementioned VGA-to-HDMI adapter being unable to convert either – this happened with the VGA-capable Dell 2719H also)
    • I had to set the BIOS options to do start-up memory tests in parallel (which sped things up a bit) (picture from the console redirection through PuTTY):
  • the on-board USB3 controller does not play nice with my IOGear 4-port GUS434 USB3.0 switch* (which I believe is a white-label of the Aten US434*) although it worked just fine on Windows and Mac OSX:

    • repeated attempts to play around in the BIOS’ USB settings ultimately resulted in an accidental USB port disablement – i.e. keyboard lock-out, which meant having to open the thing up to pull the battery, waiting a minute, then plugging everything back in and setting up the BIOS options again (because I hadn’t gotten my USB-to-serial cable and OS console redirection working yet)…
    • TBH, I believe this is a Linux kernel bug, but after many wasted hours, I still haven’t figured out how to fix this…


  • dmesg warnings:
    • workqueue: drm_fb_helper_damage_work hogged CPU for >10000us 256 times, consider switching to WQ_UNBOUND
    • ismt_smbus 0000:00:12.0: completion wait timed out
  • Intel X553 port #4 (eno4) doesn’t seem to be working properly (ethtool -m fails), although links can be brought up:


  • booting and controlling the unit through the serial console redirection:
    • another rushed order for a USB to RJ45 serial/console cable* enabled me to utilize the “standard” console port of the C3758R (for the arguable use of the word “standard”):
      • from the Qotom C3758R user manual, with my own annotations denoting pin number:
      • screenshot from Cisco’s ASA 5585-X Cable PDF with the “important” bits highlighted:
    • thankfully, by default, the BIOS is set to automatically redirects to the console with the following parameters:

      • you may just wish to change the “ANSI” setting to “VT100+” (like I did before taking this screenshot – the “ANSI” value selected is just for depicting actual values) just to “clean up” the UI, as PuTTY doesn’t seem to handle the ANSI character formatting all that well…
    • searching dmesg post-Ubuntu-install showed ttyS4 as the serial port device


So far, so good, I will provide more updates as I go through the process of OS + QEMU+KVM installation, testing of the SFP+ direct-attached optical connectors and RJ45 10GbE modules.


*NOTE: This is an affiliate link, so I may get some commission, but at no additional cost to purchasers purchasing through this link. For Amazon Affiliate links, as an Amazon Associate, I earn from qualifying purchases.

Misleading Windows Update Error 0x80070643 Fixes…

Multiple places online often suggest fixes for Windows Update error “0x80070643” by expanding the Windows Recovery Environment (“WinRE”) partition, citing a need for one at least 250MB free space.

I have an 8GB WinRE partition, so that was definitely not it.

Funnily enough, after several hours crawling through pages, I found this page, and “Fix #6” actually worked for me…

i.e. Run the .NET Framework Repair Tool

As per usual, YMMV…

CPanel Email Filters

As part of managing my own web presence, including a hosted email server with limited users (both in numbers and geography), I tend to try and cut large swathes of spam by simply “binning” any emails that have any association with specific TLDs, like .ru or .us or .cn– whereby I know that my users and I have no legitimate reason to receive any email coming from those TLDs or passing through servers using any such TLDs.

However, it came to pass that some ham were getting caught, but simply looking at the email headers was not helping. Using CPanel’s in-built testing tool was helpful in surfacing which of my rules was triggering the spam trap, but not exactly why (or what part of the email was triggering it).

The triggering rule looked like regex, so I immediately tried to hunt down converted/parsed file to try and copy the rule in converted regular expression form.

Attempting to poke at the ~/.cpanel/filter.yaml and ~/.cpanel/filter.cache and even the /etc/vfilters/<domain> did not turn up the regular expressions I was looking for.

In desperation, I took a quick look at the CPanel test tool results and decided to just copy the regex shown outright…

Unfortunately, pasting that regex directly into a regex test tool did not work…

Continue reading

ZFS Whole Disk vs. Partition…

So, with the latest replacement of disks in my RAIDZ2, I used zpool replace <pool> <old ID> /dev/sdx. Previously, while replacing with like-sized drives, it was not an issue (unless your replacement drives had “less space”).

But using the new 16TBs, I realised that ZFS decided to create one single honking 16TB partition (and a “partition #9” 8MB “buffer”), instead of matching the required 6TB and leaving empty space for future use, even when the pool had “autoexpand=off“.

So I should have replaced using a manually created partition instead of assigning the whole disk…

Sigh… Let’s see what we can do…

Continue reading

Replacing Multiple Spinning Disks Simultaneously or Serially…

So, with a 6-drive RAIDZ2, I faced a drive failure over a year ago with a “hung” Windows host (hosting the Ubuntu Server LTS Hyper-V VM with pass-through, direct access to the 6 physical HDDs used for the RAIDZ2 array) – the Windows UI was still responsive but any drive reads (e.g. Windows Explorer navigation, starting an app) “hung” the offending app attempting the drive reads (even if the dying drive was not the drive being read from)… With 2x 6TB “spares” on hand purchased over time (2017, 2018) for just such an event, a VM-and-host shutdown, HDD swap and a quick zfs replace <pool> <old GUID> <new /dev/sdx> and a “quick” resilver brought everything back to normal.

Then, three months back, I then started facing 2 failed drives – I had the one remaining 6TB “spare” replacement drive for the first, but after a 2nd failure in the span of these three months (without purchasing another set of standby replacements), it was time to start considering replacing all the drives (slowly).

Not too shabby, with ~7+ years’ lifespan of near 24/7 powered-on, low-drive write loads, with some pretty bad temperatures (near constant 50°+C to 60°C, no matter how I tried to force air flow when these were still in the DS380):

  • 2x Seagate ST6000DX001:
    • from March 2015
      • 1x failed in August 2016; RMA/replacement still running
  • 2x Seagate ST6000DM001:
    • from November 2015
      • 1x failed in November 2022
      • 1x failed in November 2023
  • 4x Toshiba X300 HDWE160:
    • 2x from July 2016
    • 1x from November 2017 (spare)
      • 1x (surprisingly the replacement drive from November 2017 that was “just” plugged in in November 2022) (just) failed in February 2024
    • 1x from November 2018 (spare)

I therefore purchased 2x Seagate Exos X18 16TB HDDs, with another still on the way… Wanting to minimise the number of resilver attempts (straining the surviving 6TBs), I attempted to pull a working drive from the degraded 5-drive RAIDZ2 array and plugged both new 16TBs in, fingers crossed that none of the remaining 4 drives give up the ghost while resilvering (confident I had important data backed up elsewhere).

I gave the replacement commands one after another:

2024/03/03 Update: Don’t assign the whole disk, manually create a partition instead and assign that as replacement instead!

And that seems to work… So, 11+ hours later, nearing the end of the resilver process, I was eagerly checking the status…

Wha..?!? Resilvering only completed on one drive (and was only now starting on the other)!

Continue reading

RO RO RO Your Drive, Gently Up The Wall…

Read-Only

Whilst attempting to manage the drives in Windows’ Disk Management MMC (Microsoft Management Console) plug-in, I accidentally set a logical drive (a RAID1 array on which a volume hosts all Windows’ users’ “My Documents” virtual folder/alias) to “offline”.

I accidentally clicked the “OK” button on the pop-up warning, and could not find a way to cancel the action thereafter.

After the Disk Management MMC plug-in/app appeared to “hang”, I restarted the system normally (i.e. via the Windows UI).

Upon reboot, Disk Management showed the disk as “Read Only”.


Attempting The Fix(es)

Attempting all the various fixes found via Google searches were to no avail i.e.

  1. using diskpart via an Administrator command prompt to clear the readonly disk flag, or
  2. attempting to create/set a HKEY_LOCAL_MACHINE\SYSTEM\CurrentControlSet\Control\StorageDevicePolicies\WriteProtect DWORD with value “0”).

Attempting to do step #1 simply threw up the error “Diskpart has encountered an error: The media is write protected.” after a long pause.

I tried:

  • “Advanced Troubleshooting” via WinRE – and because it didn’t load the RAID drivers, the RAID1 array disk could not be “selected” in diskpart
  • clearing the readonly flag repeatedly in “Windows Safe Mode with Command Prompt” using diskpart – and despite showing the disk attributes as “Read-only : No“, rebooting normally would still see the disk “stuck” (in RO mode)


The Fix

What eventually worked was

  • in “Windows Safe Mode”:
    • clearing the readonly disk attribute
    • setting the disk “offline
  • booting normally, then using “Disk Management” MMC to set the disk back to “online”


I am assuming this may not work if the boot volume was set to “read only” (but in which case I am assuming first boot will fail already).

Upgrading to pfSense 2.7.0…

Tried upgrading to 2.7.0, and as per usual, (mini) disasters ensued…

Here are some tips I need to remind myself:

  • install the sudo package (since the default admin account is disabled) – you should be able to sudo tcsh after logging in using SSH2
  • ensure your configuration backup is current (and try changing the number of auto-backup-on-change to some high number, found under Diagnostics > Backup and Restore > Config History)
  • if using “old” RSA keys for SSH2 authentication, ensure to add the following to /etc/sshd:
  • try forcing a higher resolution text mode (unfortunately, that didn’t work for me):
    • /boot/loader.conf.local:

      kern.vty=sc
      

    • /boot/device.hints:

      hint.sc.0.flags="0x180"
      hint.sc.0.vesa_mode="279"