I recently had an unfortunate episode requiring the exporting of a clip off a Dahua NVR, but I needed someone else to do it… (and no, I was not in jail, trying to instruct someone else to pull exonerating evidence off some CCTV, if that was what you were thinking)…
My original method of using the in-built web UI off the NVR, manual streaming conversion via VLC Player (after fiddling with it for a temporal configuration change to “enable” playback of .dav files) was just not going to “cut it”…
So, once I had the time, I waded into the battle of the forever-changing, forever-beta nature of Dahua firmware, software and hodge-podge end-user solutions…
SmartPSS
There happened to be a “new” version of the SmartPSS software (v2.002.0000008.0.T.190801); which was supposedly released a month ago (2019/08/01, as of writing this). This software was “supposed” to have had some (old) “enforced 1 hour video export” bug fixed. However, I was pulling my hair out as to why I could not seem to limit the video clip I chose to export. I finally found my clue and therefore am posting this here for posterity (actually, to enable other people to follow the same instructions to do this).
Give Me My Video Clip, In A Format I Can Use
So, the following are the instructions to utilise SmartPSS to export an MP4 video clip that is (mostly) universally playable (or can even be re-processed using other video processing tools like Handbrake to make them even smaller if using a more advanced codec albeit at the expense of re-compression).
I assume:
- the SmartPSS software has already been installed and configured to connect to the NVR in question
- you already have the log in credentials to the SmartPSS software
- you are using a scroll wheel mouse (i.e. a mouse with a scroll wheel)
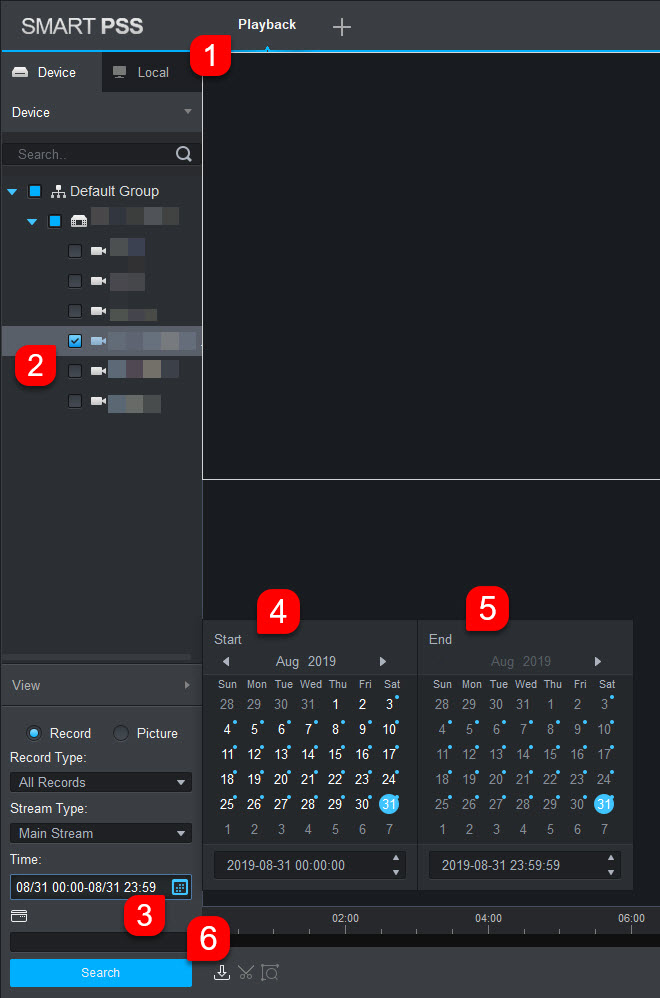
Once logged into the SmartPSS software, do the following:
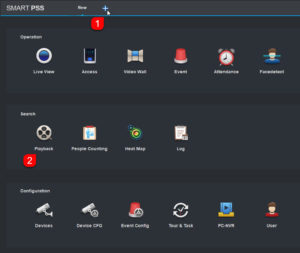
- if not already on a “Playback” tab, then click the “plus” (“+”) sign:
- once at the “Playback” tab, select the channel in question, then choose a “pretty wide” timeframe where your focus is within (we will zoom in later to set the desired, precise start and end points for the exported clip)
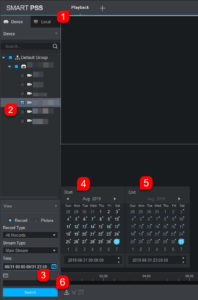
- once the available recording time frames are shown on the timeline, click/navigate to the general starting area of interest, scrolling up or down, with your mouse cursor hovering over the timeline, to zoom in or out

- left-clicking on the timeline would start the recorded stream playback; click on the scissors icon to set the start point/time; drag the resulting vertical red line (denoting the clip export start point) to the desired position, if required
The Beginning Of The End
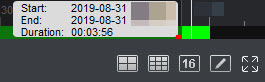
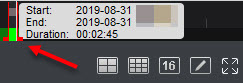
Now, here is the part that stymied me for a good half hour: the “stupid” software will automatically select the end point at a full hour out from the starting point, regardless of your playback time window selection or even the end of the recording.
So, it is up to you to actually find and move the stupidly placed end point to your point/time of choosing… But first, you need to find the end point marker!
- with the mouse cursor hovering over the timeline, scroll down to zoom out until you see the end marker

- then drag the end point marker back to where you need it to be
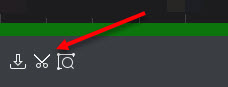
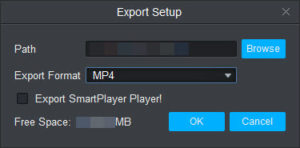
- then click the “scissors” icon again to bring up the final export window, select your desired location and format, then click “OK”

Done!
