Ubuntu LTS Set-Up
It is not every day that I have to set up a fresh install of Ubuntu, and I end up forgetting and having to repeat research on specific “tweaks”. I am now using this page as my own reference, based on an installation on x86-64 architecture hardware.
SSHd
- install ssh
apt install openssh-serversystemctl enable ssh
- create public key in
~/.ssh/authorized_keys - configure SSHd
- ensure the “main”
/etc/ssh/sshd_confighas theInclude /etc/ssh/sshd_config.d/*.confdirective at the very first active/non-commented line - create
/etc/ssh/sshd_config.d/00-default.confwith the following:# enable tunnelled password authentication PasswordAuthentication yes ChallengeResponseAuthentication yes # enable public key authentication w/possible less secure RSA keys PubkeyAuthentication yes PubkeyAcceptedKeyTypes=+ssh-rsa AuthorizedKeysFile .ssh/authorized_keys .ssh/authorized_keys2 # use local PAM UsePAM yes # disable root login PermitRootLogin no PermitEmptyPasswords no # enforce pubkey THEN password requirement: AuthenticationMethods publickey,password X11Forwarding yes AllowAgentForwarding no AllowTcpForwarding no PrintMotd no
- ensure existing ‘root’ SSH session/alternate root access in case of required rollback
- restart SSHd – any configuration issues would prevent service from restarting:
systemctl restart ssh
- test SSH log in with authorized public key then password
- ensure the “main”
Window Manager and GUI
- install a GUI/desktop for Ubuntu server
apt install lightdm
Yes, I know
lightdmruns as root, vs.gdm3which only runs the “greeter”/login manager but passes ownership to the current logged-in user, but ends up requiring a whole litany of complex work-arounds (like here and/or here) to makex11vncwork (instructions below)…apt install ubuntu-desktop dbus-x11
x11vnc
- assuming
lightdmhas been installed (as above) - install
x11vnc:apt install x11vnc
- create the password file for VNC access (past initial “one-password-for-all” authentication, the VNC window appears and OS credentials are then required):
- as
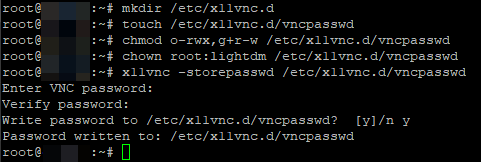
x11vncwould runs aslightdm(by service configuration below), create a directory to store the password file then secure it:mkdir /etc/x11vnc.d touch /etc/x11vnc.d/vncpasswd chmod o-rwx,g+r-w /etc/x11vnc.d/vncpasswd chown root:lightdm /etc/x11vnc.d/vncpasswd
- as
-
- run
x11vnc -storepasswd /etc/x11vnc.d/vncpasswdthen enter the password on the masked prompt
- run
- create the
/etc/systemd/system/x11vnc.serviceservice file:[Unit] Description=Start x11vnc at startup. After=multi-user.target display-manager.service [Service] Type=simple User=lightdm ExecStart=/usr/bin/x11vnc -auth guess -forever -loop -noxdamage -repeat -rfbauth /root/.vnc/passwd -rfbport 5900 -shared -display :0 Restart=always RestartSec=3 [Install] WantedBy=multi-user.target graphical.target
- reload
systemdconfiguration:systemctl daemon-reload
- enable
x11vncservice:systemctl enable x11vnc
- disable Wayland
- edit
/etc/gdm3/custom.confand remove the comment mark (“#” character) from the line#WaylandEnable=false
- edit
- reboot
Truly Headless with Dummy Monitor
- to be truly headless, create a “dummy” video card and monitor
- WARNING: if an actual display is plugged in/used, it would be part of a multi-monitor setup – I tend to prefer HDMI EDID emulators with pass-through ports (more on that here)
- w.r.t. this Stack Exchange answer, create the following sections in
/etc/X11/xorg.conf:Section "Device" Identifier "Configured Video Device" Driver "dummy" VideoRam 40000 EndSection Section "Monitor" Identifier "Configured Monitor" HorizSync 22-83 VertRefresh 50-70 Modeline "1920x1200_60.00" 193.16 1920 2048 2256 2592 1200 1201 1204 1242 -HSync +Vsync EndSection Section "Screen" Identifier "DefaultScreen" Monitor "Configured Monitor" Device "Configured Video Device" DefaultDepth 24 SubSection "Display" Depth 24 Modes "1920x1200" EndSubSection EndSection
systemd-networkd
boot delays
- tired of those 120s boot delays while the network waits for DHCP (and there isn’t a DHCPd or a even a network link)?
- follow this fix:
sudo systemctl disable systemd-networkd-wait-online.servicesudo systemctl mask systemd-networkd-wait-online.service
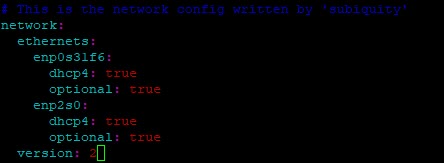
- also mark all unneeded interfaces as optional e.g. in
/etc/netplan/nn-whatever.yaml:
- to find out which services are impacted:
sudo systemctl show -p WantedBy network-online.target
resolv.conf and DNS Resolution
- if using
systemd-networkd,/etc/resolv.confmay get overwritten (or to be technically correct, regenerated) and the correct/recommended practice should be to either edit/etc/systemd/resolved.confor add some file in/etc/systemd/resolved.conf.d/(e.g./etc/systemd/resolved.conf.d/00-default.conf):[Resolve] DNS=8.8.8.8
- to check, run
systemd-analyze cat-config systemd/resolved.conf
networkd-dispatcher
- if you need to run “hook” scripts ala
ifupdownof ‘ye ol days, or even just advanced configuration like turning off offloading in/etc/network/interfaces,netplanjust made is unnecessarily more complicated; unfortunately, my scripts in/etc/networkd-dispatcher/configured.d/never ran (maybe because I was usingsystemd-networkdinstead ofNetworkManager, so YMMV)- P.S. I got fed up and created my own script and
systemdservice to handle post network start-upethtoolcommands- create
disable-network-offloading.shscript in location of choice#!/bin/bash #troubleshooting logging info=/tmp/disable-offloading-systemd-cat-pipe-info mkfifo "$info" trap "exec 3>&-; rm $info" EXIT systemd-cat -p info < "$info" & exec 3>"$info" DATESTAMP=`date +"%Y-%m-%d"` LOGFILE=/tmp/disable-offloading.$DATESTAMP.log DEVICE_IFACE_LIST="enp4s0 enp5s0 enp6s0 enp7s0 enp8s0 enp11s0f0 enp11s0f1 enp13s0f0 enp13s0f1 br1 br0 virbr0" ETHTOOL_COMMAND_OPTIONS="gro off gso off hw-tc-offload off lro off ntuple off rx off rxhash off rxvlan off rx-vlan-filter off rx-vlan-hw-parse off rx-vlan-offload off sg off receive-hashing off tso off tx off tx-checksum-ip-generic off tx-gre-csum-segmentation off tx-gre-segmentation off tx-gso-partial off tx-ipxip4-segmentation off tx-ipxip6-segmentation off tx-scatter-gather off tx-scatter-gather-fraglist off tx-udp_tnl-csum-segmentation off tx-udp_tnl-segmentation off tx-udp-segmentation off txvlan off tx-vlan-hw-insert off tx-vlan-stag-hw-insert off ufo off tx-tunnel-remcsum-segmentation off tx-esp-segmentation off tx-vlan-stag-hw-insert off tx-vlan-offload off rx-vlan-stag-hw-parse off rx-vlan-stag-filter off tx-gso-list off tx-gso-robust off tx-fcoe-segmentation off tx-sctp-segmentation off tx-checksumming off tx-checksum-ip-generic off scatter-gather off tx-scatter-gather off tcp-segmentation-offload off tx-tcp-segmentation off tx-tcp-ecn-segmentation off tx-tcp-mangleid-segmentation off tx-tcp6-segmentation off generic-segmentation-offload off generic-receive-offload off " for iface in $DEVICE_IFACE_LIST ; do echo -n "$iface: ">>$LOGFILE && ethtool -K $iface $ETHTOOL_COMMAND_OPTIONS>>$LOGFILE 2>&1 && echo "">>$LOGFILE done
- create
systemd/etc/systemd/system/disable-network-offloading.serviceservice file, changing the script file path to suit[Unit] Description=Runs script system post network start up. Wants=network-online.target After=network.target network-online.target [Service] Type=simple User=root ExecStart=/<path>/disable-offloading.sh [Install] WantedBy=multi-user.target - register the service then start it
systemctl daemon-reloadsystemctl start disable-network-offloading
- the only issue is that this does not work on “
vnetN” devices created when guest VMs are started
- create
- P.S. I got fed up and created my own script and
Repository Maintenance
- upgrading from old versions may have “remnant” repositories lurking around
- show the what is in the encoded
/etc/apt/trusted.gpgfile:apt-key --list
- manually remove individual entries (using the fingerprint):
apt-key del "xxxx xxxx xxxx xxxx xxxx xxxx xxxx xxxx xxxx xxxx"
- check the sources in
/etc/apt/sources.list.d - check the trusted sources in
/etc/apt/trusted.gpg.d - check sources in
/etc/apt/sources.list:- show what is in
/etc/apt/sources.list:add-apt-repository --list
- manually remove individual entries (using entire line):
add-apt-repository --remove "deb [arch=amd64] http://dl.google.com/linux/chrome/deb/ stable main"
- show what is in
- show the what is in the encoded
- purging removed packages with “
residual-config” (e.g. configuration files):apt list | grep residual-config | cut -d'/' -f1 | sudo xargs apt -y purge
Fix Broken/Partial/Stuck Package Installs
- try any of the following in order:
sudo dpkg --configure -asudo apt-get install -f- delete pending actions:
sudo rm -fr /var/lib/dpkg/updates/*
Serial Console
- trying to get Ubuntu to pipe everything through the serial console that may be available on your motherboard is a two-step process:
- getting GRUB to redirect everything (although tooling to do an install outright from console-only is out of scope here):
- make a backup before doing anything:
sudo cp /etc/default/grub /etc/default/grub.bak
sudo vi /etc/default/gruband add/edit the following lines:GRUB_CMDLINE_LINUX_DEFAULT="console=tty0 console=ttyS4,115200n8" GRUB_TERMINAL_INPUT="console serial" GRUB_TERMINAL_OUTPUT="console gfxterm serial" GRUB_SERIAL_COMMAND="serial --port=mmio,0xdf519000 --speed=115200 --word=8 --parity=no --stop=1"
- note that the
--portargument is usually replaced with--unit; I only document this parameter here in reference with another page – check the manual for more information
- note that the
- update grub (
sudo update-grub), and after step #2 below, reboot!
- make a backup before doing anything:
- getting Ubuntu to stick to the baud rate for a specific serial port (the “generic” agetty’s
--keep-bauddoes not seem to work!)- create a copy of the
serial-getty@tty.servicefile specific to the serial port (which in my example, isttyS4):sudo cp /lib/systemd/system/serial-getty\@.service /lib/systemd/system/serial-getty\@ttyS4.service
sudo vi /lib/systemd/system/serial-getty\@ttyS4.serviceand edit theagettycommand line to force the baud rate, e.g.:- changing:
ExecStart=-/sbin/agetty -o '-p -- \\u' --keep-baud 115200,57600,38400,9600 - $TERM
- to:
ExecStart=-/sbin/agetty -o '-p -- \\u' 115200 - $TERM
- changing:
- link the new service file:
ln -s /lib/systemd/system/serial-getty@ttyS4.service /etc/systemd/system/getty.target.wants/
- then reload
systemctland start the service:systemctl daemon-reloadsystemctl start serial-getty@ttyS4.service
- create a copy of the
- getting GRUB to redirect everything (although tooling to do an install outright from console-only is out of scope here):
QEMU and KVM
- ensure virtualization settings have been enabled in BIOS (e.g. Intel’s VT-x or AMD’s AMD-V)
- run the following:
apt install qemu-kvm libvirt-daemon-system libvirt-clients virt-manager
- add specific users to the kvm group to enable them to control VMs without using
sudo:adduser <user> kvm
- reboot
Disabling/Changing libvirt‘s virbr0 NAT Interface
- in case the
libvirt-installed NAT virtual NIC interferes with anything, run the following commands to temporarily nuke the virtual NIC:sudo virsh net-destroy default
- to bring it back to life:
sudo virsh net-start default
- in case you need to change some settings (e.g. IP address), simply:
- copy the XML file and edit
cp /usr/share/libvirt/networks/default.xml /tmp/default.xml
- set libvirt to use new definition
sudo virsh net-destroy defaultsudo virsh net-undefine default # needed to avoid errors belowsudo virsh net-define /tmp/default.xml
- restart
libvirt‘s NAT interfacesudo virsh net-start default
- clean up
rm /tmp/default.xml
- copy the XML file and edit
