Ubiquiti’s Motto: If It Ain’t Broke, Don’t Won’t Fix It
After my upgrade of my Ubuntu LTS 16.04 to 18.04, I discovered some things had broken, including the Unifi Controller used for my UAP-HD. Apparently, the entire /usr/lib/unifi directory disappeared (alongside with MongoDB)!
Rooting around the Internet turned this thread up… And accordingly, there is a work-around, with some “clean-up” work.
The “official” fix is relatively useless, but that is another shouting match argument with another idiot person for a different time…
Anyway, on to the fix!
NOTE
The “fix” offerred below is not really one – it does not restore your data, although you could conceivably do so if you got creative in restoring some data files before re-installing MongoDB version 3.4 as per below…
Backing Up A Bit
Well, first off, I needed to make sure I backed up whatever files are left over. Fortunately, I managed to find the MongoDB data and some other files, so I just tar‘d them up – just in case…
tar -zcvf ~/unifi_backup.tar.gz /var/lib/unifi /usr/lib/ubiquityThereafter came the apt clean-up…
apt --fix-broken install At this stage, you might actually see the Unifi was uninstalled.
To save you the trouble: simply (re-)installing MongoDB will not work as the upgrade pooched your MongoDB (read why, and also find the fix here).
Backing Up Even Further
To cut the long story short, I drove into the wall due to the above issue and had to, quite literally, downgrade MongoDB to 3.4, activate that stupid setting then upgrade again.
mv /etc/mongodb.conf /etc/mongodb.conf.bakapt purge mongo-tools mongodb-server mongodb-server-core unifi
At this time, both Unifi and the MongoDB from the Ubuntu repository is gone, leaving only the files.
echo "deb [ arch=amd64,arm64 ] http://repo.mongodb.org/apt/ubuntu xenial/mongodb-org/3.4 multiverse" | sudo tee /etc/apt/sources.list.d/mongodb-org-3.4.listapt-key adv --keyserver hkp://keyserver.ubuntu.com:80 --recv BC711F9BA15703C6apt updateapt install mongodb-orgapt install unifi
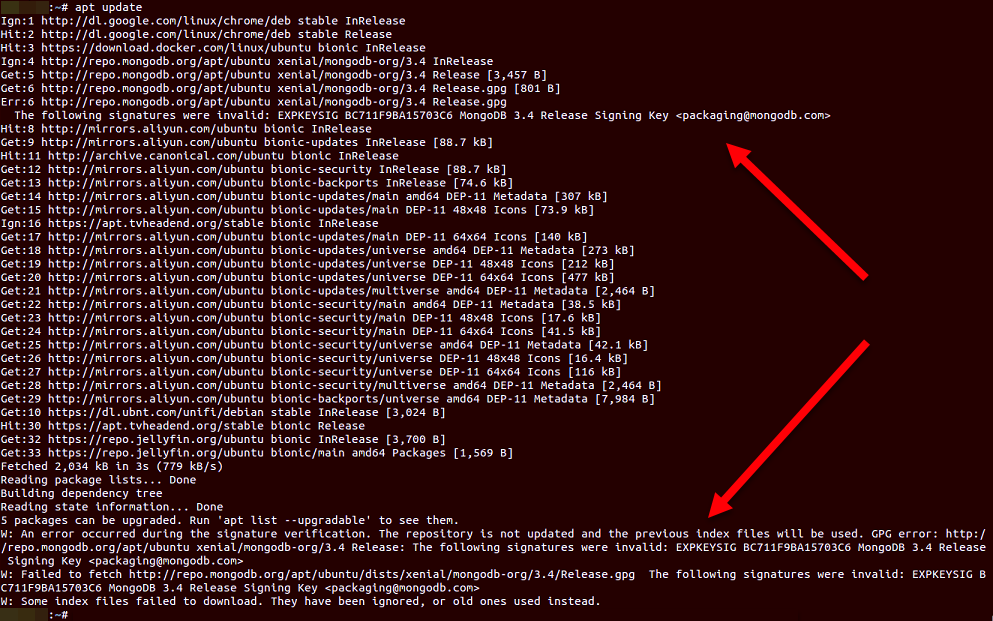
2020/03/28 Update: After suffering through countless
apt updateerrors due tomongodbsource signature errors (but ignoring them), I finally sat down to try and fix this.
Turns out, after a false start attempting to change the source server, I ended up finding this, and all I needed to do was to update the signature:
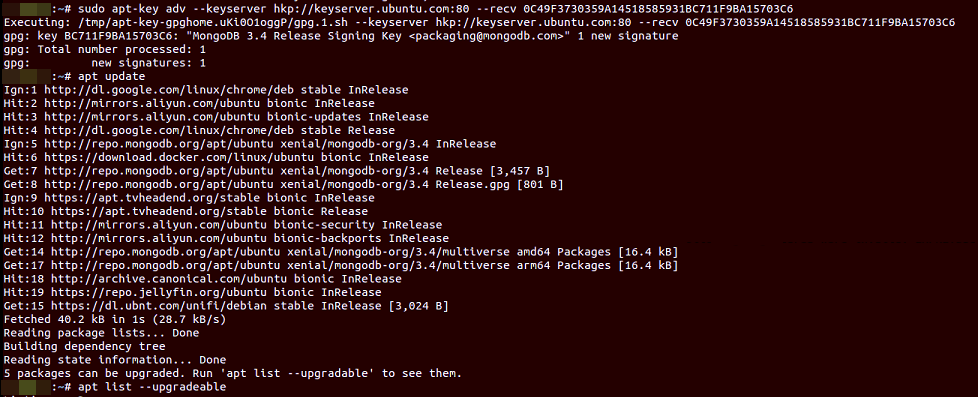
sudo apt-key adv --keyserver hkp://keyserver.ubuntu.com:80 --recv 0C49F3730359A14518585931BC711F9BA15703C6Of course, the 5 packages have been “locked”, so will need to be unlocked to update…
Just run
apt-mark unhold <package>against the 5 packages as per the NOTE below, then runapt upgradeagain.
Re-installing Unifi on the old MongoDB version 3.4 was necessary as Unifi was the one that started up MongoDB using the specific Unifi-only data files.
At this point, I was really pissed off, and I just chose to add in the “compatibility flag” as below (just in case I forget to next time) and simply restored the entire configuration from a back up .unf file and stopped here (i.e. I did not bother updating to the latest version/s of mongodb nor upgrade to the shiniest, newest version/s of the Unifi Controller.)
mongo localhost:<port>> db.adminCommand( { setFeatureCompatibilityVersion: "3.4" } )
NOTE
The last command (i.e.db.adminCommand) is actually run as a MongoDB command (i.e. in the MongoDB environment that you entered, having run themongocommand.
The <port> number should be retrieved from the/usr/lib/unifi/logs/mongod.logfile.
Furthermore, if you wish to stop here (i.e. and not bother upgrading anything), you have to ensureaptdoes not try to automatically updatemongodbagain, runapt-mark hold <package>on the following packages:
*mongodb-org
*mongodb-org-mongos
*mongodb-org-server
*mongodb-org-shell
*mongodb-org-tools
The Theory
Since the above is where I got off the “stupid” train, you could, in theory, restore the DB files deleted when you removed Unifi and before you re-installed MongoDB version 3.4 (specifically, mongodb-org), and you should get back your data without having to restore it (and in which case, you still have to run the MongoDB command as above).
Assuming this was done correctly (i.e. your data was retained), it is then time to back up the files again, then uninstall, reverse the apt sources, and re-install everything:
tar -zcvf ~/unifi_backup_fixed.tar.gz /var/lib/unifi /usr/lib/ubiquityapt remove mongodb-org mongodb-org-mongos mongodb-org-server mongodb-org-shell mongodb-org-tools unifirm /etc/apt/sources.list.d/mongodb-org-3.4.listapt updateapt install -y mongodb
After that, download the same version of the Unifi Controller (e.g. version 5.9.29 in my case), then proceeded to force an install directly via dpkg:
dpkg --install --force-depends-version unifi_sysvinit_all.deb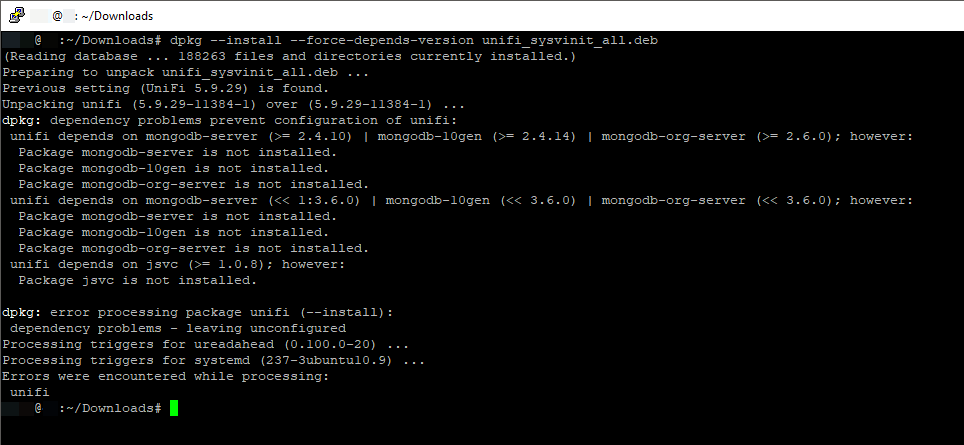
Since you “went-around” the maximum version limitation of dpkg, we now need to “clean up” the mess that the Unifi Controller package made, or else all future apt, apt-get and/or dpkg will forever not work, complaining of a “broken installation”… So we need to:
- manually edit the
/var/lib/dpkg/statusfile (you will needsufor this) - find
Package: unifiand remove the “maximum” requirements:

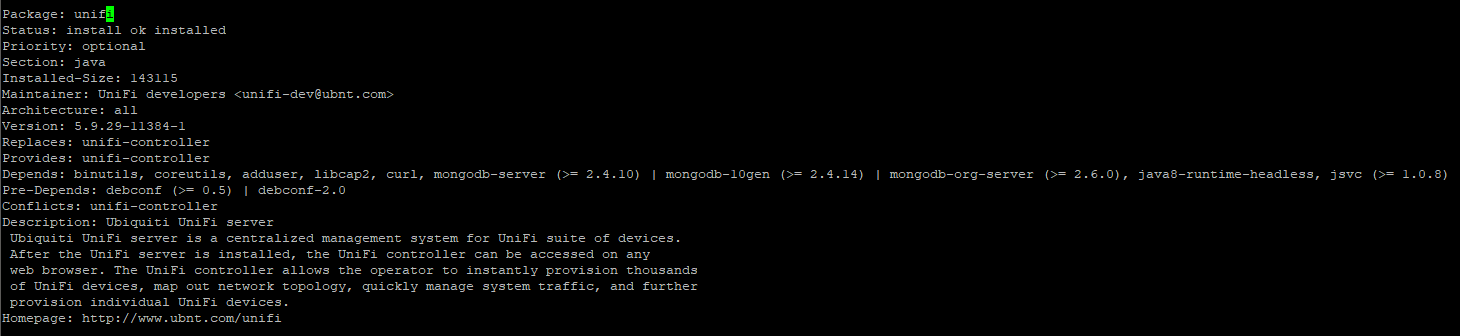
As per the unifi package installation screenshot, the next step was to install jsvc and it’s dependency, libcommons-daemon-java.
apt install libcommons-daemon-javaObviously, at this point, this simply meant you got back your Unifi Controller files, but, as per the complaints in the forum/s, you would not be able to start it…
The Fix
So, onwards with the actual fix:
First, remove the executable file (which is simply a link):
rm /usr/lib/unifi/bin/mongodThen we create a “replacement” mongod script:
#!/bin/bash
ARR=()
while [[ $# -gt 0 ]]; do
  key="$1"
  case $key in
    --nohttpinterface)
      shift
      ;;
    *)
      ARR+=("$1")
      shift
      ;;
  esac
done

set -- "${ARR[@]}"
exec /usr/bin/mongod $*
And lastly, make sure it is executable:
chmod a+x mongodNow try and restart everything:
service unifi start