Secure Boot Shim-anigans Ahoy!

So, I had to purchase a new laptop for someone, and as per usual, it came with the entire SSD capacity allocated, which I still feel is bad practice – specifically ensuring there is unallocated space that the drive firmware knows about, assuming TRIM is supported by both OS, controller and drive, (which, AFAIK, all “modern” OS and hardware do) to improve the drive’s wear-leveling ability and thereby extending the SSD’s lifespan.

To do so, I use a “rule of thumb” to leave ~20% of unpartitioned space – at the “end” of the disk (from a “logical” view of the partition table, regardless MBR or GPT). Usually, I simply use a “multi-boot” USB stick created using YUMI or Ventoy (the former now looking like a “wrapping” of the latter in its latest “exFAT” variant).

Aware of the shenanigans/rain dance required to make UEFI secure boot work from such bootloaders, like hundreds of other times (but never done for awhile), I simply (1) disabled CSM in BIOS, (2) enabled secure boot (and rebooted), (3) manually loaded the ENROLL_THIS_KEY_IN_MOKMANAGER.cer into the key store via BIOS from the prepared Ventoy USB disk…

I then confidently rebooted the laptop, pointing to the USB UEFI as the boot device, then ran headlong into the wall with a sickening SMACK. The wall was black, with only the words “Verifying shim SBAT data failed: Security Policy Violation” emblazoned across the top…

Attempting to fix this on this “new” laptop took me off on tangent, wasting nearly a half day trying to research and resolve… Hopefully this helps someone else with the “summary” below, assuming you have a working Linux system that can mount the USB device’s bootloader (i.e. EFI partition), since Windows cannot (without jumping through hoops)…

Continue reading

Misleading Windows Update Error 0x80070643 Fixes…

Multiple places online often suggest fixes for Windows Update error “0x80070643” by expanding the Windows Recovery Environment (“WinRE”) partition, citing a need for one at least 250MB free space.

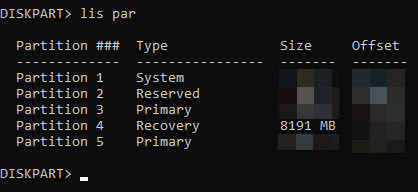
I have an 8GB WinRE partition, so that was definitely not it.

Funnily enough, after several hours crawling through pages, I found this page, and “Fix #6” actually worked for me…

i.e. Run the .NET Framework Repair Tool

As per usual, YMMV…

CPanel Email Filters

As part of managing my own web presence, including a hosted email server with limited users (both in numbers and geography), I tend to try and cut large swathes of spam by simply “binning” any emails that have any association with specific TLDs, like .ru or .us or .cn– whereby I know that my users and I have no legitimate reason to receive any email coming from those TLDs or passing through servers using any such TLDs.

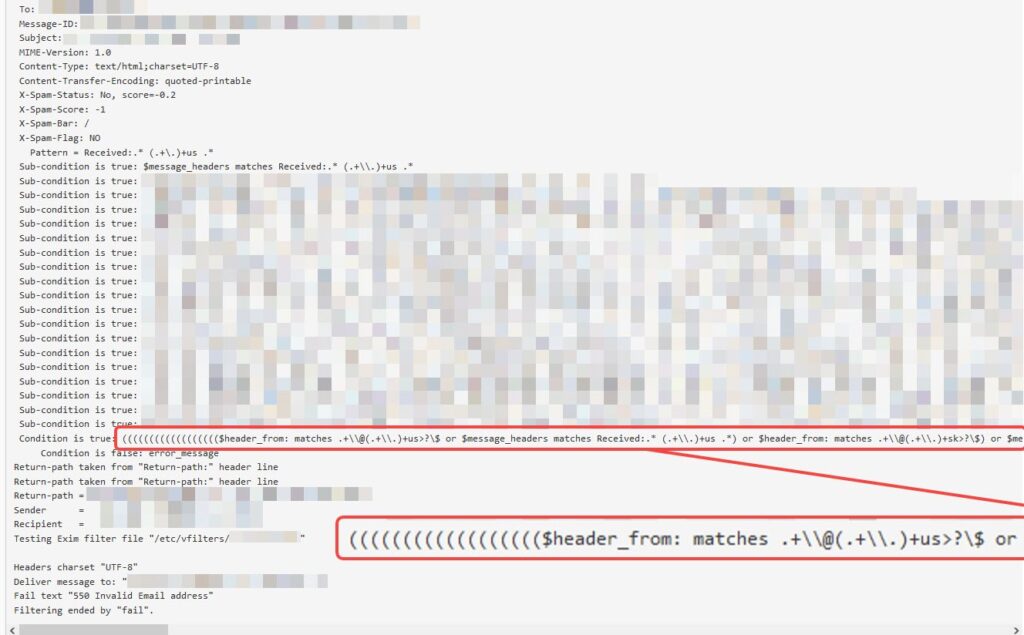
However, it came to pass that some ham were getting caught, but simply looking at the email headers was not helping. Using CPanel’s in-built testing tool was helpful in surfacing which of my rules was triggering the spam trap, but not exactly why (or what part of the email was triggering it).

The triggering rule looked like regex, so I immediately tried to hunt down converted/parsed file to try and copy the rule in converted regular expression form.

Attempting to poke at the ~/.cpanel/filter.yaml and ~/.cpanel/filter.cache and even the /etc/vfilters/<domain> did not turn up the regular expressions I was looking for.

In desperation, I took a quick look at the CPanel test tool results and decided to just copy the regex shown outright…

Unfortunately, pasting that regex directly into a regex test tool did not work…

Continue reading

ZFS Whole Disk vs. Partition…

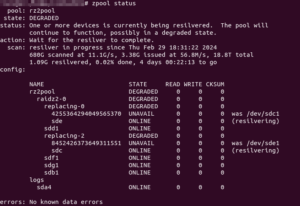
So, with the latest replacement of disks in my RAIDZ2, I used zpool replace <pool> <old ID> /dev/sdx. Previously, while replacing with like-sized drives, it was not an issue (unless your replacement drives had “less space”).

But using the new 16TBs, I realised that ZFS decided to create one single honking 16TB partition (and a “partition #9” 8MB “buffer”), instead of matching the required 6TB and leaving empty space for future use, even when the pool had “autoexpand=off“.

So I should have replaced using a manually created partition instead of assigning the whole disk…

Sigh… Let’s see what we can do…

Continue reading

Replacing Multiple Spinning Disks Simultaneously or Serially…

So, with a 6-drive RAIDZ2, I faced a drive failure over a year ago with a “hung” Windows host (hosting the Ubuntu Server LTS Hyper-V VM with pass-through, direct access to the 6 physical HDDs used for the RAIDZ2 array) – the Windows UI was still responsive but any drive reads (e.g. Windows Explorer navigation, starting an app) “hung” the offending app attempting the drive reads (even if the dying drive was not the drive being read from)… With 2x 6TB “spares” on hand purchased over time (2017, 2018) for just such an event, a VM-and-host shutdown, HDD swap and a quick zfs replace <pool> <old GUID> <new /dev/sdx> and a “quick” resilver brought everything back to normal.

Then, three months back, I then started facing 2 failed drives – I had the one remaining 6TB “spare” replacement drive for the first, but after a 2nd failure in the span of these three months (without purchasing another set of standby replacements), it was time to start considering replacing all the drives (slowly).

Not too shabby, with ~7+ years’ lifespan of near 24/7 powered-on, low-drive write loads, with some pretty bad temperatures (near constant 50°+C to 60°C, no matter how I tried to force air flow when these were still in the DS380):

  • 2x Seagate ST6000DX001:
    • from March 2015
      • 1x failed in August 2016; RMA/replacement still running
  • 2x Seagate ST6000DM001:
    • from November 2015
      • 1x failed in November 2022
      • 1x failed in November 2023
  • 4x Toshiba X300 HDWE160:
    • 2x from July 2016
    • 1x from November 2017 (spare)
      • 1x (surprisingly the replacement drive from November 2017 that was “just” plugged in in November 2022) (just) failed in February 2024
    • 1x from November 2018 (spare)

I therefore purchased 2x Seagate Exos X18 16TB HDDs, with another still on the way… Wanting to minimise the number of resilver attempts (straining the surviving 6TBs), I attempted to pull a working drive from the degraded 5-drive RAIDZ2 array and plugged both new 16TBs in, fingers crossed that none of the remaining 4 drives give up the ghost while resilvering (confident I had important data backed up elsewhere).

I gave the replacement commands one after another:
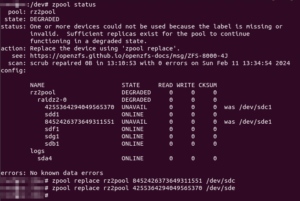
2024/03/03 Update: Don’t assign the whole disk, manually create a partition instead and assign that as replacement instead!

And that seems to work… So, 11+ hours later, nearing the end of the resilver process, I was eagerly checking the status…
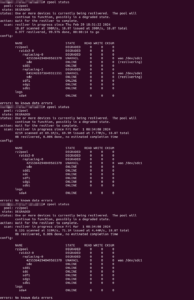
Wha..?!? Resilvering only completed on one drive (and was only now starting on the other)!

Continue reading

RO RO RO Your Drive, Gently Up The Wall…

Read-Only

Whilst attempting to manage the drives in Windows’ Disk Management MMC (Microsoft Management Console) plug-in, I accidentally set a logical drive (a RAID1 array on which a volume hosts all Windows’ users’ “My Documents” virtual folder/alias) to “offline”.

I accidentally clicked the “OK” button on the pop-up warning, and could not find a way to cancel the action thereafter.

After the Disk Management MMC plug-in/app appeared to “hang”, I restarted the system normally (i.e. via the Windows UI).

Upon reboot, Disk Management showed the disk as “Read Only”.


Attempting The Fix(es)

Attempting all the various fixes found via Google searches were to no avail i.e.

  1. using diskpart via an Administrator command prompt to clear the readonly disk flag, or
  2. attempting to create/set a HKEY_LOCAL_MACHINE\SYSTEM\CurrentControlSet\Control\StorageDevicePolicies\WriteProtect DWORD with value “0”).

Attempting to do step #1 simply threw up the error “Diskpart has encountered an error: The media is write protected.” after a long pause.

I tried:

  • “Advanced Troubleshooting” via WinRE – and because it didn’t load the RAID drivers, the RAID1 array disk could not be “selected” in diskpart
  • clearing the readonly flag repeatedly in “Windows Safe Mode with Command Prompt” using diskpart – and despite showing the disk attributes as “Read-only : No“, rebooting normally would still see the disk “stuck” (in RO mode)


The Fix

What eventually worked was

  • in “Windows Safe Mode”:
    • clearing the readonly disk attribute
    • setting the disk “offline
  • booting normally, then using “Disk Management” MMC to set the disk back to “online”


I am assuming this may not work if the boot volume was set to “read only” (but in which case I am assuming first boot will fail already).

Upgrading to pfSense 2.7.0…

Tried upgrading to 2.7.0, and as per usual, (mini) disasters ensued…

Here are some tips I need to remind myself:

  • install the sudo package (since the default admin account is disabled) – you should be able to sudo tcsh after logging in using SSH2
  • ensure your configuration backup is current (and try changing the number of auto-backup-on-change to some high number, found under Diagnostics > Backup and Restore > Config History)
  • if using “old” RSA keys for SSH2 authentication, ensure to add the following to /etc/sshd:
  • try forcing a higher resolution text mode (unfortunately, that didn’t work for me):
    • /boot/loader.conf.local:

      kern.vty=sc
      

    • /boot/device.hints:

      hint.sc.0.flags="0x180"
      hint.sc.0.vesa_mode="279"

Cookies! Time to (Third) Party!

So, I am (more or less) forced to use Chrome for work, although my default browser is still Firefox (with a nifty little extension called OnChrome that automatically redirects/re-opens all links for specific domains set to open in Chrome with a specific profile instead – a huge shout out to @Gervasio Marchand)…

But within several of the web-based programs my employer uses, it often embeds resources that point back to Google sites, documents, etc. – which then simply shows a 403 error instead of the intended resource…

Continue reading

scrcpy 1.2.5 and jpeg-xl 0.7…

I use scrcpy on a Mac for work, it being much more reliable than Apple’s phone screen casting.

Unfortunately, a recent update somewhere broke scrcpy, throwing the following errors about libjxl.0.7.dylib, which I hunted down to be part of the JPEG-XL libraries. Unfortunately, a brew reinstall jpeg-xl did not fix anything, nor an update to ffmpeg via brew.

dyld[85687]: Library not loaded: /usr/local/opt/jpeg-xl/lib/libjxl.0.7.dylib
  Referenced from: <A5A72418-D065-3FAA-8CD4-AC945B980E8D> /usr/local/Cellar/ffmpeg/5.1.2_1/lib/libavformat.59.27.100.dylib
  Reason: tried: '/usr/local/opt/jpeg-xl/lib/libjxl.0.7.dylib' (no such file), '/System/Volumes/Preboot/Cryptexes/OS/usr/local/opt/jpeg-xl/lib/libjxl.0.7.dylib' (no such file), '/usr/local/opt/jpeg-xl/lib/libjxl.0.7.dylib' (no such file), '/usr/local/lib/libjxl.0.7.dylib' (no such file), '/usr/lib/libjxl.0.7.dylib' (no such file, not in dyld cache), '/usr/local/Cellar/jpeg-xl/0.8.1/lib/libjxl.0.7.dylib' (no such file), '/System/Volumes/Preboot/Cryptexes/OS/usr/local/Cellar/jpeg-xl/0.8.1/lib/libjxl.0.7.dylib' (no such file), '/usr/local/Cellar/jpeg-xl/0.8.1/lib/libjxl.0.7.dylib' (no such file), '/usr/local/lib/libjxl.0.7.dylib' (no such file), '/usr/lib/libjxl.0.7.dylib' (no such file, not in dyld cache)Library not loaded: /usr/local/opt/jpeg-xl/lib/libjxl.0.7.dylib
  Referenced from: <974A1E71-57EB-3EE9-90F2-ECA39A6415F6> /usr/local/Cellar/ffmpeg/5.1.2_1/lib/libavcodec.59.37.100.dylib
  Reason: tried: '/usr/local/opt/jpeg-xl/lib/libjxl.0.7.dylib' (no such file), '/System/Volumes/Preboot/Cryptexes/OS/usr/local/opt/jpeg-xl/lib/libjxl.0.7.dylib' (no such file), '/usr/local/opt/jpeg-xl/lib/libjxl.0.7.dylib' (no such file), '/usr/local/lib/libjxl.0.7.dylib' (no such file), '/usr/lib/libjxl.0.7.dylib' (no such file, not in dyld cache), '/usr/local/Cellar/jpeg-xl/0.8.1/lib/libjxl.0.7.dylib' (no such file), '/System/Volumes/Preboot/Cryptexes/OS/usr/local/Cellar/jpeg-xl/0.8.1/lib/libjxl.0.7.dylib' (no such file), '/usr/local/Cellar/jpeg-xl/0.8.1/lib/libjxl.0.7.dylib' (no such file), '/usr/local/lib/libjxl.0.7.dylib' (no such file), '/usr/lib/libjxl.0.7.dylib' (no such file, not in dyld cache)

In a rush to get things fixed, this is my “quick fix”…

Continue reading

Ubuntu 22.04.1 Upgrading Pains…

So, I had left my little Ubuntu server alone and neglected, giving it the occasional glance, the occasional log in and do an apt-get update && apt-get autoremove

Well, with my recent shenanigans surrounding a power cut (self-caused, mind you), I was also prompted to upgrade to Ubuntu LTS 22.04.1…

.1“… Well! That should be more stable (than the .0 released back in April)! O00-kay! Time to give it a whack!

Turns out, things went south pretty fast and I needed half an evening to right everything…

Continue reading